Happy New Year cheers to a new healthy, happy, and joyful 2021!
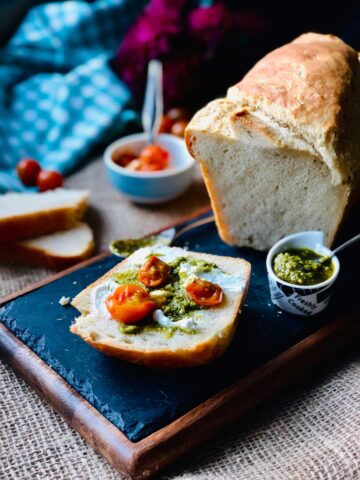
There isn't anything more rewarding than bread home-baking and this time I have made this seeded spelt sourdough in a dutch oven. the perfect beginner's recipe, easy and so darn good, baked to perfection too. Oh, that crust!
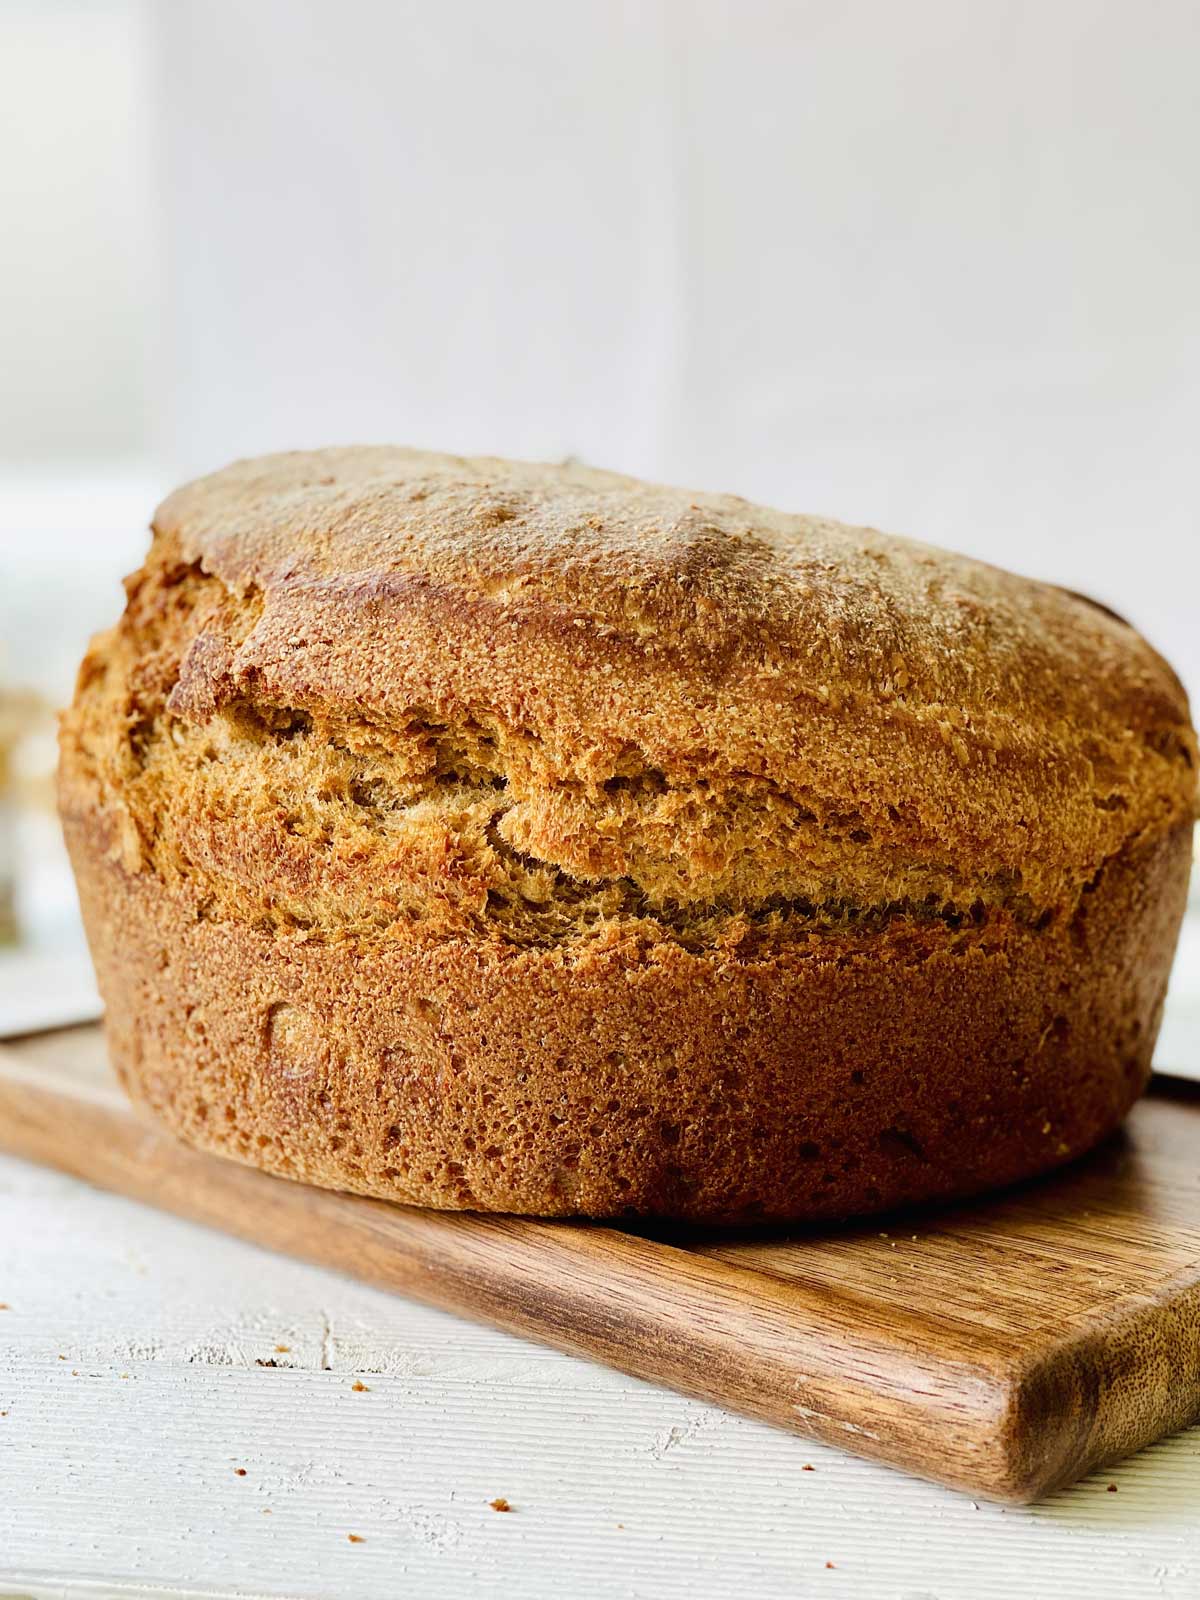
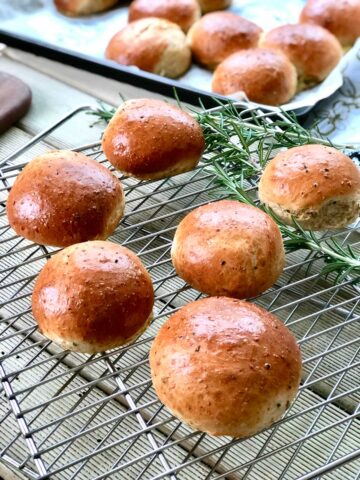
I cannot help but add seeds to almost all the bread that I am making. I love the texture the seeds add to the bread but also the nutritional benefits. This is a nice recipe that I have been using for years and it has always been a true success without a failure.
There are a lot of questions asked when it comes to sourdough bread and I will try and answer as many as possible here if you feel you still have a question to ask, please feel free to poo that below under the comments section, I will be more than happy to respond to that.
What is Spelt sourdough?
In very short and simple terms, sourdough is slow-fermented bread and is most likely the oldest form of leavened bread used in ancient Egypt. It is believed to have been discovered by accident when bread dough was left out and formed the starter resulting in a bread that had a lighter texture and tasted so much better.
Any sourdough recipe begins with a starter, a mixture of flour, water, and sometimes, to help things speed up, some, add a little sugar. The mixture is sat at room temperature where airborne and grain wild yeasts settle into this starter resulting in fermentation that occurs after a few days of TLC (touch, love, and care).
This process gives the starter a sour smell and only then becomes ready to use. It can be kept for many years if treated with care and respect. I did buy one a few years back starter from a bakery that was over 40 years old. How wonderful, right!?
Sourdough is unique because it does not require commercial yeast in order to rise, instead, it is used in live fermented culture or a sourdough starter, which serves as a natural leavening agent.
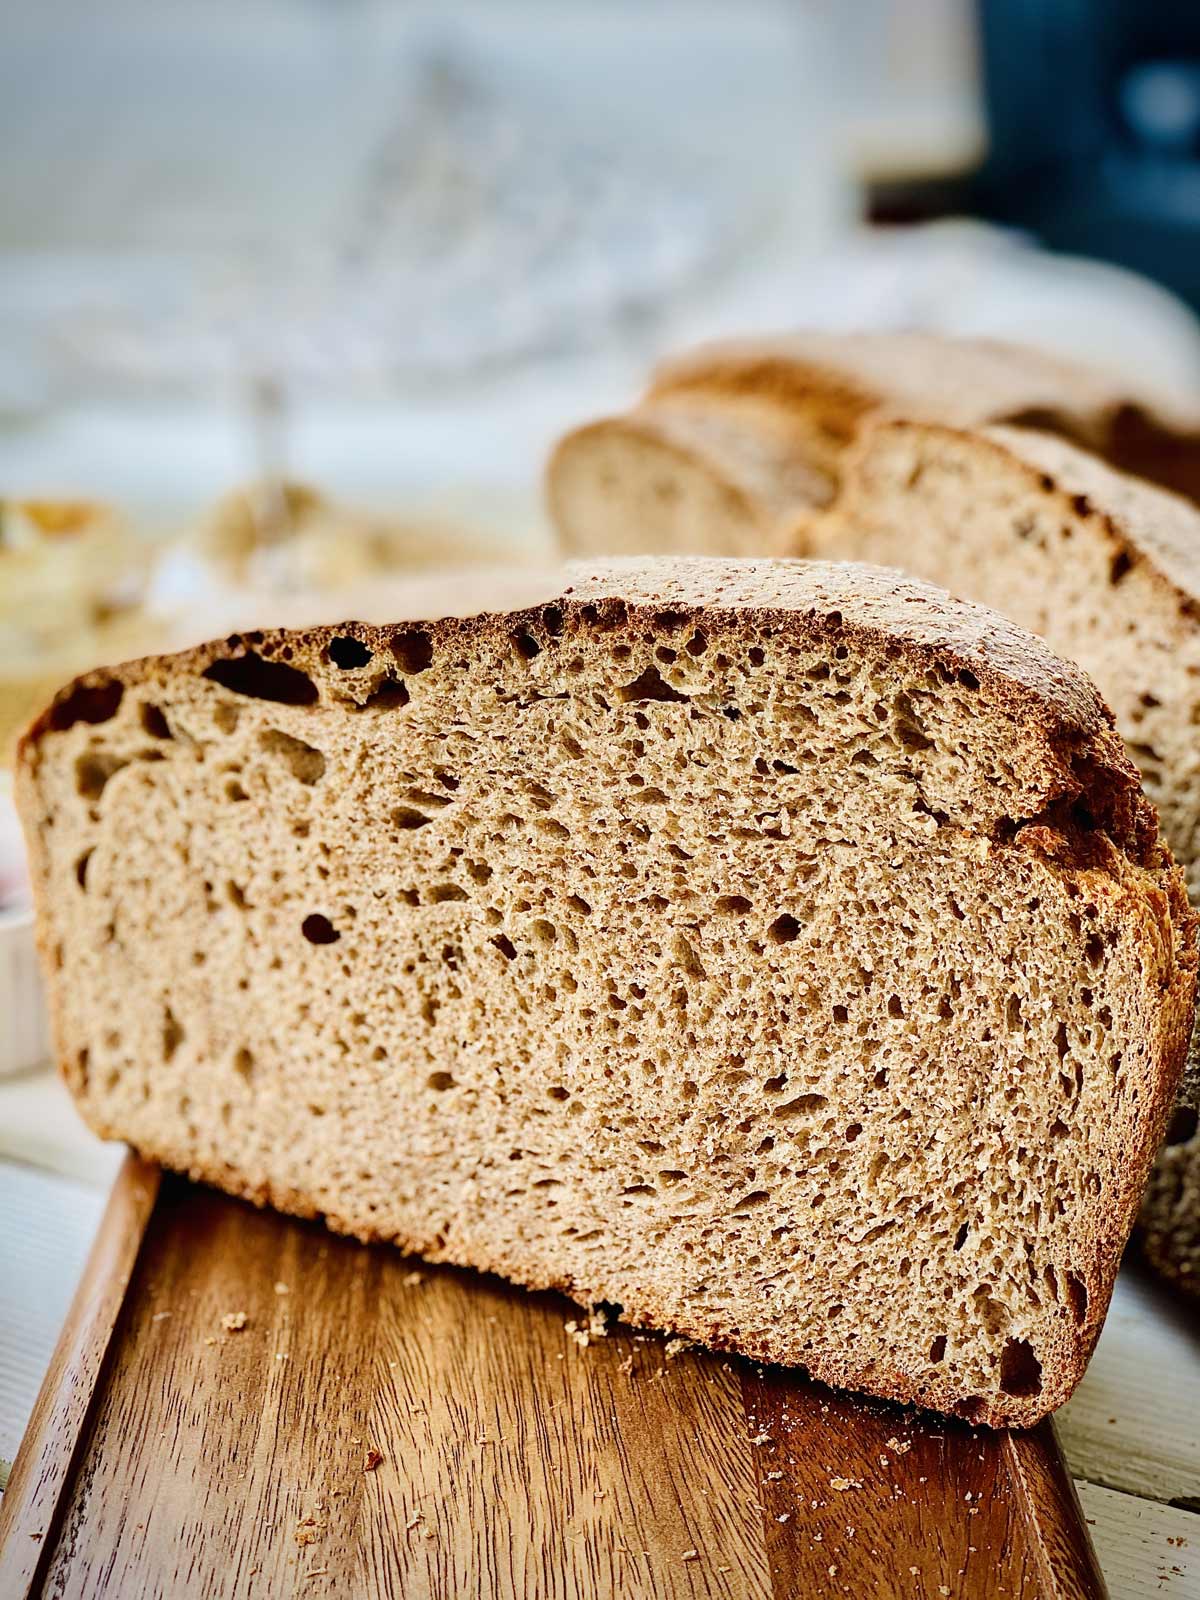
The characteristics of a good sourdough are the nice and crispy crust, chewy texture, slightly tangy flavor, and small or big holes - depending on the level of hydration (low hydration will mean small crumbs or holes, the higher the bigger the holes too).
I love spelt sourdough (it is my favorite) it tastes much better, spelt makes it sweet and nutty. Sourdough generally makes me feel a lot better - no bloating and no weird feeling after having it, unlike the regular yeast one. I have to admit that I cannot leave my sourdough too long (overnight as I would love to) since my kids are not too keen on having it if it is too sour. But I love sourdough bread with these big bubbles (holes) - they not only look amazing but you also need to look and see where the spread disappeared. Haha! Amazing stuff.
How to make sourdough bread?
Making sourdough bread may sound like something complicated! It is not! Not at all. In fact, it is probably easier than making any other bread that requires quite a bit of kneading. This does not even need that. All you need it's some little sourdough starter, some little time, and patience, that is all.
How to make spelt sourdough starters?
Here I will tell you how to make a sourdough starter (a live culture of flour and water), it is for anyone that's a novice in this, no experience is needed at all. All you need is some flour, some water, and some... patience!
Before you even know it, you'll have your very own bubbly, active starter ready to make this incredible spelt sourdough bread. The starter doesn't have to be made out of spelt flour, it can be any type of flour, white, white spelt, wholemeal or rye starter.
Making a starter takes about 7-14 days from start to finish. What is a starter? It is like growing yeast in a jar and this can be a quicker or slower process depending on some factors and can be a little unpredictable at times. All that takes it's patience, yes, no knowledge, just patience. It will be rewarding!
How to feed a sourdough starter?
Here is a summary of how to get a sourdough starter started and fed after it was 'born':
- Day 1: 60g flour + 60g water = 120g starter
- Day 2: Do absolutely nothing ( actually give it a name) I call mine Callum
- Day 3: Remove & discard ½ of day 1 starter=>60g starter + 60g flour + 60g water = 180g
- Day 4: Remove & discard ½ of day 3 starter=>90g starter + 60g flour + 60g water = 210g
- Day 5: Remove & discard ½ of day 4 starter=>105g starter + 60g flour + 60g water = 225g
- Day 6: Remove & discard ½ of day 5 starter =>112g starter + 60g flour + 60g water = 232g
- Day 7: Remove & discard ½ of day 6 starter =>116g starter + 60g flour + 60g water =236g
Starter aftercare:
Just like any living creature, the starter must be kept alive by feeding it regularly so that it can remain healthy and strong. If your starter is not strong, your bread will simply not rise.
Caring for your starter is much easier than you'd ever think and it will surely not take hours of your time as you may have initially thought.
How often to feed a sourdough starter?
- Start by removing and discarding about half of your starter.
- Refresh what's left in the jar with fresh all-purpose flour and some water.
- Cover and allow to rise at room temperature until it gets bubbly and it doubles in quantity/size.
- The bubbles will become frothy and then these will disappear, that's when you'll know it is time to feed your starter.
- The starter will need everyday feeding if it's stored at room temperature and once a week if it is refrigerated.
Note: Have you missed a feed? Do not worry if you miss one feeding. The starter will definitely not die, it might look ugly and it might smell terrible but it will recover and get back to being vigorous again, I promise. It is just a matter of that little TLC but that simple feeding, maybe a few times, will perk up again.
FAQs
From a health viewpoint, sourdough, in general, stands out when compared to any supermarket loaf. The acids that are naturally forming from the long fermentation process help to break down the gluten.
This makes sourdough a lot more digestion-friendly, and a lot easier to be assimilated and tolerated by our bodies. It does taste a lot better too if you ask me and if you are a sourdough lover, you know what I mean, if you haven't had it yet…. oh my, wait no more and get that starter going immediately.
No. It is not gluten-free. Wheat sourdough bread contains less gluten than regular yeast bread, but it's not gluten-free. If you're on a gluten-free diet, regular sourdough bread isn't safe so, do not opt for it, instead, go for a gluten-free starter and flour.
You may use any type of flour (wholemeal, all-purpose, spelt, organic, non-organic. I just do not recommend bleached flour since that has chemicals that will have an impact on the rising process. Depending on the flour, you may also have to adjust the texture with some extra water if this is too thick.
I generally use all-purpose organic flour or non-organic works even quicker for the starter as you will need to discard quite a bit of flour and it can be expensive if you use expensive flour.
For quicker results, start with whole wheat flour as it ferments quicker and carry on feeding with organic white flour for a slower fermentation process meaning that you could feed every two days if kept outside at room temperature and still once a week if refrigerated. If it is too hot outside and room temperature means hot, refrigerate.
If your starter is used to one type of flour, then you do swap it out with a different type it might need some time to adjust, it might react great pretty much immediately or, it might require some time before perking up.
Yes, but it needs to be a really warm ambient. You may need to use either some sugar and yogurt or yeast (fresh or dry). So, mix 60 ml water + 60 g wholegrain flour + 1 tablespoon yeast, and 1 teaspoon sugar. It will make an amazing starter but it will not be a yeast-free one.
* using any wholemeal or whole-grain flour helps with speeding the process.
I bake often but I do not have more than one or two slices a day. I am lucky with kids and hubby helping consume it. I always allow it to get completely cool, I slice it and freeze it in bags. I take out one or two slices, whenever needed, toast it and eat it.
It can be refrigerated for a good 4-5 weeks. It is absolutely great way of storing any bread.
More bread recipes you may like
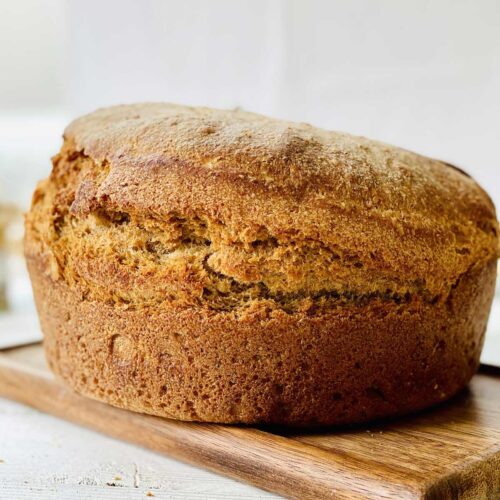
Easy Homemade Spelt Sourdough
Equipment
- bowl
- Dutch oven
- scraper
Ingredients
- 700 g spelt flour or any flour or a mix you may wish to use (avoid all-purpose/bleached flour)
- 300 g wholemeal flour
- 700 ml warm water 66-70% is the ideal hydration - it always works great
- 200 g starter (a nice and bubbly one)
- 50 ml olive oil leave some for greasing the dish if you chose to
- 15 g salt I used Himalayan pink
- 1 tablespoon flour for dusting
- 4 tbsp chia seeds or a mix of seeds ( chia, linseed, sunflower, , hemps and pumpkin seeds)
Instructions
Making the dough
- Place the flour (both spelt and wholemeal) into a larger bowl glass or wood ( avoid metal at any cost). Mix the flour with the seeds to make sure they are well combined. Make a well in the centre, add the sourdough starter, the warm water and knead until you have a nice dough. Add the olive oil and knead a little further.
- Cover the bowl with cling film or a clean and damp kitchen towel. Allow autolysing (to rest) for 30 to 60 minutes (it is entirely up to you). After the dough has had the initial rest, work this making it into a ball shape (whilst still in the bowl). This will take approximately 15-20 seconds.
Bulk Rise
- The dough needs to rise and this will be a slower process than the yeast made bread. Temperature is crucial to this - the warmer the quicker the process will take place.
- Cover the bowl with cling film/wrap or a very damp kitchen cloth. Allow it to rest in a warm spot to rise. The dough is ready when it no longer looks dense and has doubled/ almost doubled in size. This can take anywhere from 3 to 12 hours depending on the temperature of your ingredients, the potency of your starter and the ambient. In the summer at 30°C or 86°F in a sunny spot rise times can take anywhere between 3-4 hours whereas, in the winter (20°C / 68°F), the dough can take anything between 9-12 hours to rise. Oh Yes!
Optional Step - To Stretch And Fold The Dough
- During the bulk rise process, you have the option to perform the stretch & fold op. This will help with strengthening your beautiful sourdough dough. You can start this 30 minutes into the bulk rise.
- Gather a portion of the dough, stretch it upwards and then fold it over itself. Rotate the bowl ¼ turn and repeat this process until you have come full circle to complete 1 set. Do this once or twice spaced about an hour apart. Although this step is not mandatory, it will increase the total volume and height of your bread. Weird, yes, I know!! This should take a minute or two.
Shape the dough
- Remove the dough from the bowl, and place onto a floured work surface so it does not stick. You may notice that the dough will gently deflate as you fold and shape it.
- Using your hands, gently fold the sides of the dough in and rotate it, using quarter turns in a circular motion. Repeat this process until you are happy with its giant bun appearance.
Place The Dough For The Second Rise
- Now the dough needs to rise again, but luckily it is only for 1 hour or so.
- Coat the bottom of your Dutch oven with cornmeal, oil or parchment paper to prevent your sourdough from sticking (I do the latter). Place the dough inside for a second rise which is no longer than 1 hour and cover with the lid or, again, a very damp cloth. The dough will be ready when it is slightly puffy. this time it does not need to double in size.
- Preheat your oven at 220°C or 425° F towards the end of the second rise.
Score Your Dough
- This step is optional but if you chose to do it, just before your sourdough goes into the oven, using a blade or a bread lame, make a cut for about 3-4 inches long in the centre of the dough.
Bake Your Sourdough
- Place the bread into the preheated oven right in the centre (leave the lid on) and reduce the temperature to 200°C or 400° F. Bake at this temperature for about 20 minutes. Remove the lid, and continue to bake (uncovered) for an additional 40-45 minutes or until your bread looks golden brown. Please do remember that all ovens are different.
- When ready, remove the bread from the oven and cool on a wire rack for at least an hour before slicing. Don't cut too soon or else the inside will have a gummy raw texture!
- If you chose to freeze it, allow it to cool completely, slice and freeze for later.
Notes
- To speed up the process in the winter, you can place the dough in the oven and put the oven light on or set it for 30C/85F.
- Try and work with warm ingredients to speed up the proving process.
Nutrition
More about hydration ratios
Water ratio can range between 50% ( for a pretty dense loaf) and 80% ( a ciabatta for instance). A high water ratio is essential in getting those nice big wholes in the bread also known as "open crumb".
At first, making a dough with these high water ratios may make you think that it cannot be right and generally, bakers use machinery to 'handle' that annoyingly sticky and fairly runny dough. It can be done by hand too but it takes some practice to handle that dough and a good old dough scraper would be of great help.
Here's a video that shows you how to handle high hydration dough.


Rina says
Can you explain difference between spelt flour and whole meal flour.
I have spelt grains that I mill myself. Can I use 1000g of my milled spelt grains to replace the 700g spelt flour and 300g whole meal flour?
Just found your website today. Looking forward to seeing what else you have.
Ramona says
Hey Rina,
Thank you for stopping by.
It is such a great thing to be able to mill your own grains, WOW!!
Spelt flour and wholemeal flour are both types of flour, but they have some differences, spelt flour is made from spelt grains, an ancient variety of wheat that has a slightly sweet and nutty flavor compared to regular wheat flour.
Spelt flour is often preferred by people who have sensitivity to modern wheat varieties.
Though it does contain gluten, it has a lighter texture compared to wholemeal flour.
Wholemeal flour, aka whole wheat flour, is made by grinding the entire wheat kernel, including the bran, germ, and endosperm. It has a denser texture and a stronger, nuttier flavor.
Wholemeal flour is rich in fiber, vitamins, and minerals due to the bran and the germ inclusion.
Regarding your question about substituting milled spelt grains for spelt flour and wholemeal flour I would say that if you have milled your own spelt grains, you essentially have a whole grain flour similar to wholemeal flour.
You can certainly use 1000g of your milled spelt grains, absolutely!
It should work fine as a replacement for the combination of spelt flour and wholemeal flour. Using your milled spelt grains should yield good results, especially if you're looking for a wholesome, whole grain texture.
I would be delighted to hear how your sourdough came out but I am sure it will be lovely.
I will be also pleased to know you will try other recipes of mine.
Thanks again!!
Ramona
James says
Best sourdough loaf I've baked yet. Required a little lower hydration percentage and longer baking for me, but absolutely amazing. I did 2 bulk ferments of 12h each and the sourness is superb! 😀
It came out a little dense, but well worth it. Think I'll have to freeze some though haha. Thanks for sharing.
Ramona says
thank you James - lovely to hear, thnk you so much for the feedback 😉
Jasna says
Hello
Thank you for the recipe. We have the starter finally ready and are going to try this out. Is there an alternative to using a Dutch oven though? We do not have one...
Thanks!
Ramona says
Hi Jasna,
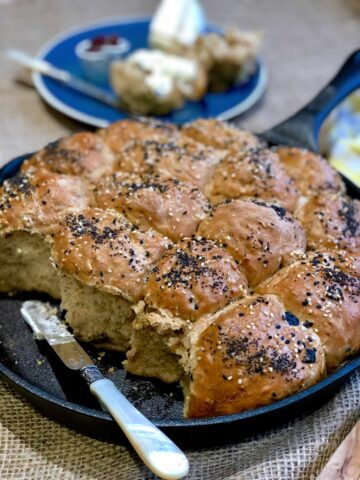
Thanks for stopping by and for your question. I use different dishes almost every time depending on the amount of bread/ dough I am making. Any bread tray, skillet, Creuset dish would work, even a sheet pan would if your dough is nice and viscous. Good luck! Please do come back and let us know how it all went.
FOODHEAL says
This bread came looks amazing! I admire your patience in making the starter, it obviously pays with the taste.
Heidy says
I made this seeded spelt sourdough in a dutch oven as you mentioned, and man it was to of this world good. I will be making this again for sure. Happy New Year!
Ramona says
Yayy, so happy for you Heidy, yes, I love the Dutch oven - it is the absolute best for bread baking. Thank you so much for the feedback!
Veronika Sykorova says
I actually like spelt bread more than regular wheat bread! I like how dense it is. Yours looks really good, I'm definitely going to attempt making my own loaf next week!
Ramona says
Thank you Veronika,
The density is dictated by the time the bread is left for proofing but also by the hydration which determines the crumb. My bread always comes out different because I love playing with flour, quantities of starter, time proofing. I am so happy you will try and make your own sourdough next week, good luck and let us know how it's all going 😉
Amanda says
This loaf came out beautifully! It had that classic sourdough tang that I just love, and the crust was perfectly crisp with a nice soft interior.
Ramona says
Than you so much for your feedback Amanda, I am so glad it did work perfectly for you too.
Loreto Nardelli says
I am always intimidated by making sourdough bread. Always have heard the success lies in the starter. You have given great instructions and maybe one day I will leak through the fear!
Thank you for sharing!
Ramona says
Thank you Loreto, I know a lot of my friends say this too. It is intimidating until you will only realise you are baking just like a pro.
Leslie says
I am definitely a beginner and this recipe was just perfect for me! Thank you for explaining so well!
Lori says
I truly am #bodybycarbs and this bread has my name all of it! It looks absolutely amazing and perfect for breakfast tomorrow! I cannot wait to make it!
Marisa F. Stewart says
I am ashamed to say I killed my sourdough by neglect. I'll have to start all over again and I'm going to try your schedule -- hopefully this time I'll do better. I've been wanting to use the spelt that's in my freezer.
Ramona says
I know that feeling Marisa, that's happening to anyone - been there a few times. but I always have two as a backup - I have a 40-year-old one that I am looking after like gold 😉
Marta says
There's nothing more comforting than good bread, in my opinion. Because you took the time to detail every step to keep the starter fed, everyone will be successful! Great job and, I'm looking forward to trying this out.
Adriana says
What a show stopper this is! Spelt flour I have never used now; I have a recipe to follow and try to make the bread with spelt flour. My husband love s sourdough, so I bake a loaf often. I Will make this recipe on my next baking batch.
HEATHER PERINE says
I've been using spelt a lot more - totally love this flour!! Can't wait to try this with my sourdough starter!
Ramona says
Thank you Heather! Spelt is amazing! I almost bake with it entirely 😉
Chef Dennis says
This looks soooo delicious!
Ramona says
Aw, thank you chef!
Raquel says
A delicious homemade bread!
Amanda Marie says
I just got some starter and can't wait to try it!
Ramona says
Yay! Great start to 2021 - healthy bread all the way!
Thank you Amanda!